
1. From the DocControl app, select the Folder that you want to add a Document to.

2. In the Documents pane, click Browse Files to upload Document. Then complete the following fields.
-
File: Uploading a file is required. Select the appropriate file from your computer to complete the upload process.
-
Name: Naming the document is required. Enter a clear and descriptive title to help users easily identify the document’s content and purpose.
-
Description: Providing a description is optional. Use this field to offer additional context or details about the Document’s content to assist users in understanding its purpose.
- Users can streamline the Documentation process by clicking the designated icon to automatically generate a Document description using AI. The content of your Document is never stored or used to train the model. This feature is designed to save time and increase efficiency while still allowing full customization—users can edit the generated description as needed.
-
Controlled Toggle: Users can specify whether a Document is controlled by selecting Yes or No. Selecting No indicates that the Document will be stored but will not be subject to expiration dates or revision cycles.
-
Doc ID Mode: This allows Users to choose between Default and Custom settings. Selecting Default will automatically assign the next available Document ID, while Custom enables Users to manually enter a Document ID of their choice.
-
Click Next.
%20Updated.gif?width=670&height=356&name=2.)%20Updated.gif)
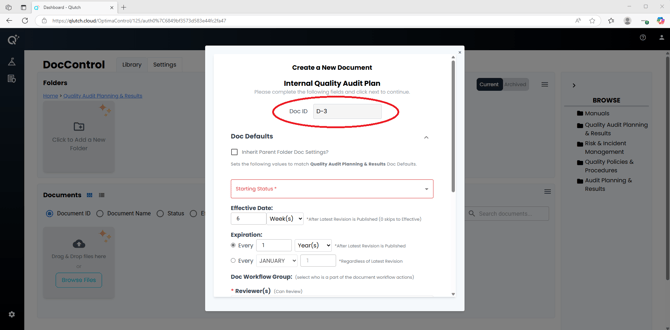
3. Complete the Doc Defaults fields.
-
Doc ID: If Default was selected, this field will be locked and cannot be edited. If Custom was selected, this field becomes editable, allowing Users to enter a Document ID of their choice.
-
Inherit Parent Folder Doc Settings: Enable Inherit Parent Folder Doc Settings if you want the Document workflow settings to mirror those configured in the parent folder. If this box is checked, the remaining fields will then auto-populate accordingly.
If the Inherit Parent Folder Doc Settings is not enabled, complete the Doc Default fields to apply the desired settings to the individual Document.
-
Set Starting Status: This is a required field. This allows a User to define the initial status assigned to a document upon creation, streamlining document entry and accelerating setup during initial implementation.
-
Set Effective Date: This is an optional field. This setting defines the duration a document remains in Published status after final Approval, before becoming Effective. This period is typically used for training and document acknowledgment. A setting of '0' will skip the Published phase and make the document Effective immediately.
-
Set Expiration: This is an optional field. This setting defines when a document is considered Expired. Upon expiration, an action is triggered for Document Owners to Review and confirm whether the document is current or requires revision. The expiration can be set to occur after a fixed time period from the latest Published revision, or on a fixed calendar date each year.
-
Assign Reviewer(s): Users or Groups can be added as Reviewers. Users added are assigned Review actions when a Review session is initiated for the document. While not a required step in the Qlutch document lifecycle, Review allows Editors to gather feedback before proceeding to Approval. The session is considered complete once all assigned Reviewers have submitted their input, at which point the document returns to Draft status for further editing.
-
Assign Approver(s): Users or Groups can be added as Approvers. Users added will be assigned Approval actions when an Approval session is initiated for the document. Editors initiate this session to obtain final sign-off. The document is Published only if all Approvers select Pass; if any Approver selects Fail, the document returns to Draft status for further revision.
-
Doc Acknowledgements: When enabled, Doc Acknowledgements trigger an action for all Users assigned as Required Acknowledgers. These Users must acknowledge they’ve reviewed the newly approved revision, ensuring documented awareness and accountability.
-
Assign Required Acknowledger(s): Users or Groups can be added as Required Acknowledgers. Users added will receive an acknowledgment action when the document has had an approved revision, prompting them to acknowledge they have reviewed this latest amendment.
-
Related Documents: This field enables quick search and selection of other Documents. Selecting a Document establishes an association between the current Document and the selected Document(s).
-
Click Next.
4. Designate your Doc Collaborators who can manage this Document.
-
Inherit Parent Settings: Enable Inherit Parent Settings if you want the Document Collaborator settings to mirror those configured in the parent folder. If this box is checked, the remaining fields will then auto-populate accordingly.
If the Inherit Parent Settings is not enabled, complete the Doc Default fields to apply the desired settings to the individual Document.
-
Assign Owner(s): This is a required field. You can add Users or Groups to this field. Users added here will be granted permissions to View or Edit the assigned Document. Owners also receive escalation actions for the document, such as Expirations.
-
Assign Editor(s): This is a required field. You can add Users or Groups to this field. Users added here will be granted permissions to View and Edit the assigned Document. Editors also have the ability to launch Reviews or Approvals as needed.
-
Assign Viewer(s): This is an optional field. You can add Users or Groups to this field. Users added here will be granted permissions to View the assigned Document.
-
Click Create.
